Business Name: Anderson Brothers Truck & Equipment
Address: 2640 State Hwy 99 N #1, Eugene, OR 97402
Phone: (541) 688-8686
Anderson Brothers Truck & Equipment
Anderson Brothers Truck & Equipment is a long-established truck parts and repair company located in Eugene, Oregon. Founded in 1949, the business has served the region for more than 70 years, building a reputation as a reliable source for heavy-duty truck parts, custom fabrication, and equipment repair. The company works with commercial vehicle owners, fleets, and equipment operators who need dependable parts and services to keep their trucks operating safely and efficiently.
A core focus of Anderson Brothers is providing specialized services for heavy-duty trucks and equipment. Their shop offers custom driveline fabrication and repair, helping customers build, rebuild, or balance drivelines for a wide range of applications. They also specialize in custom U-bolt bending and fabrication, producing precisely sized components for trucks and other heavy equipment. In addition, the company sells both new and used truck parts, stocking a large inventory and offering local delivery in the Eugene and Springfield areas.
Beyond parts sales, Anderson Brothers provides repair and maintenance services for truck components such as transmissions, differentials, and related systems. Their experienced team focuses on delivering practical, cost-effective solutions that help keep trucks and equipment running reliably. With decades of experience and a commitment to local service, Anderson Brothers Truck & Equipment continues to support the trucking and transportation industries throughout Eugene and surrounding communities.
2640 State Hwy 99 N #1, Eugene, OR 97402
Business Hours
Monday: 7:30 AM–6 PM Tuesday: 7:30 AM–6 PM Wednesday: 7:30 AM–6 PM Thursday: 7:30 AM–6 PM Friday: 7:30 AM–6 PM Saturday: 8 AM–2 PM Sunday: Closed
Facebook: https://www.facebook.com/andersonbrotherseugene
Instagram: https://www.instagram.com/andersonbrotherste/
Heavy-duty trucks reside in a world of shock loads, high grades, payload spikes, and long hours at stable speed. The driveline sits at the center of that punishment. When it is right, the truck feels planted, foreseeable, and quiet even under torque. When it is incorrect, the shake journeys from the floorboard to the mirror stalks, U-joints scar themselves to death, and equipments start to chatter. Getting a custom driveline developed or fixed is not a luxury item for show trucks. It is core dependability work, the kind of attention that keeps a fleet's expense per mile within forecast and prevents roadside calls that take place at the worst time.
This is a trade where numbers matter as much as the torch. I have actually viewed experienced fabricators tack, check, and remedy a shaft three times simply to claw back a few thousandths of runout, because they knew that sloppiness here shows up later at 65 miles per hour as heat in a cheap carrier bearing. The details pay off.
Start with the issue, not the parts
It is tempting to jump to new yokes and thicker tube, but the best custom driveline work begins with a clear diagnosis. Not all vibrations indicate the very same repair. A rumble that rises with road speed often traces to shaft balance, tire or wheel concerns, or a bent tube. A pulsing under heavy throttle at low speed can be U-joint brinelling, worn slip splines, or a bad carrier bearing. A harmonic that peaks near a specific highway speed mean a crucial speed concern. Getting orientation from those patterns conserves cash and steers every choice that follows, from tube size to joint series to whether you split a long single shaft into a two-piece with a midship bearing.
I keep notes from test drives. Build the routine of logging when the vibration appears, what gear, throttle position, speed, and whether it fades throughout coast or grows under load. That page becomes your develop spec as much as any measurement.
Measure for fitment like it is aerospace
A durable shaft that is the incorrect length, or the best length with the wrong operating angle, is still a failure. Set trip height first, with the truck as it will live when working. Air suspensions ought to be at normal driving height. Raised leaf trucks should have pinion angle set where it belongs, locked down with appropriate hardware. This is where Custom U Bolts appear in the real life. If you use shims under leaf springs to correct pinion angle, those shims change the stack height, and you need longer U bolts with complete thread engagement and correct torque. Sloppy clamping lets the axle rotate under load, which kills U-joints and splines.
For measurements, be precise and consistent. Tail housing flange to pinion flange is the typical standard, however blended flange patterns or half-round yokes change how you measure and what adapters you may drivelines require. Keep in mind pilot sizes, bolt circle diameters, and spline count at the slip. On heavy trucks I still see 3 separate yoke sizes on the same car: 1710 at the transmission, 1760 midship, and 1810 at the axle. Mixing these unintentionally complicates balance and service.
A couple of crucial figures guide length: aim for mid-travel at the slip when the truck sits at trip height. Leave sufficient plunge for full suspension compression without bottoming, and enough extension for droop without shaft pullout. On long wheelbase tandems, that can be an inch or more each way, depending upon geometry. Mark phasing before teardown. On two-piece shafts, the front and rear must be timed correctly to cancel velocity variations. If the truck showed up with a misphased shaft, do not copy the error. Right it.
Here is a compact list I utilize before dedicating to tube size or yokes:
- Driveline length at ride height and at full bump and droop Flange types, pilot sizes, bolt circle, and U-joint series at each end Operating angles at transmission output, provider bearing, and pinion, within 0.5 degree match where required Slip spline travel readily available vs needed, including seal land and stop-to-stop distances Frame installing points and rigidity for any carrier bearing or midship support
Materials and tube sizing are torque mathematics, not guesswork
Most durable drivelines use DOM steel tube, frequently 1020 or 1026. Wall thickness normally falls in between 0.120 and 0.188 inch, with outdoors diameters of 3.5 to 6 inches depending upon torque and length. Chromoly, like 4130, appears in serious responsibility or high rpm environments but is not common in vocational trucks due to the fact that the expense seldom buys proportional advantage for the rpm variety. Aluminum shafts have weight benefits, but in heavy service they can trade damage resistance and long-term toughness for a weight number that does not change profits. For a lot of fleets, stout steel pages the bills.
Bigger tube increases bending tightness and raises critical speed, however it changes clearance to crossmembers, exhaust, and brake plumbing. On a long shaft, the action from 4 inch to 5 inch OD can move a critical speed from approximately 2,800 rpm to 3,400 rpm, a cushion you will feel at highway cruise. Those are estimate, not an alternative to estimation. If you are within a few hundred rpm of your cruise shaft speed, do not gamble. Modification the tube, split the shaft with a provider, or adjust ratio if your usage case allows it.
Weld yokes and midship stubs need to match television size and wall so the weld joint has even heat input and consistent strength. You desire a clean V-groove, constant feed, and complete penetration without burn-through shoulders. A lot of shops will pre-heat much heavier sections and surface with an aligning pass before balance. A driveline that looks straight to the eye can still show 0.020 inch total showed runout. The target is generally under 0.010 inch TIR on television and 0.004 to 0.006 at the weld shoulders for durable shafts. The straighter it is, the less weight you will be stacking during balance.
U-joint series, yokes, and phasing matter like gear choice
Pick U-joint series based on torque and joint angle, not what was on the shelf. Common heavy-duty series consist of 1710, 1760, 1810, and 1880. Capability differs with running angle and lubrication, however as a rough guide, moving from 1710 to 1810 is a meaningful jump in torque score and cap diameter. Full-round yokes with bolted bearing caps hold much better under shock than strap-style half-rounds, and they tolerate re-torque cycles better. Do not mix strap bolts across brands. Bolt length, shoulder, and thread pitch vary, and the incorrect bolt offers a false sense of clamp. Most 1710 to 1810 cap bolts land in the 70 to 120 lb-ft torque variety. Always validate from the yoke maker's spec sheet.
Phasing is non-negotiable. The front and rear joints on a single shaft need to rest on the exact same airplane. If one ear is clocked a few degrees out, the shaft presents a second-order vibration that balance can not fix. On two-piece systems, the phasing changes in foreseeable methods to cancel speed ripple across the carrier. If you are not specific, set the support angles, then search for the appropriate clocking for the specific arrangement. An incorrect guess shows up on the very first test drive.
Angles, carrier bearings, and why one degree can matter
U-joints like to move. A joint that performs at exactly absolutely no degrees never rotates its needles, which chews flats in the bearings, then grows vibration under light load. Go for 1 to 3 degrees of running angle at each joint on a single shaft, with the transmission output and pinion angles equal and opposite within roughly half a degree. That range keeps the needles alive without producing a big sine-wave in speed.
Two-piece shafts follow comparable logic however include the provider. Set the provider bracket so that the front and rear sections each live in a comfy angle window. Try to keep the front shaft short and stiff to press crucial speed greater. On long wheelbase tractors, splitting the overall length into a front shaft around 40 inches and a back that suits the axle spacing typically keeps both within safe rpm.

Carrier bearings deserve real mounting. A soft or cracked rubber support, a bent bracket, or a frame crossmember that can flex under load will appear as oscillation that ruins a mindful balance task. Mount the provider on clean, flat steel, and shim to set height rather than slotting holes. If you adjust height, recheck angles at every joint.
Balancing and critical speed: understand your numbers
A sturdy shaft ought to be dynamically balanced at a speed that represents how it will live. Shops vary in technique, however balancing at or above the shaft's expected highway rpm provides the best read. Including weights to hit zero is not the goal if the tube or yokes are not straight. Right gross runout first, then balance. A common heavy truck shaft can be stabilized to a residual level in the area of a couple of gram-inches, frequently tighter on much shorter, stiffer pieces. If a store has to stack a handful of slugs around the circumference, you likely missed a straightening step.
Critical speed is the rpm where the shaft's first bending mode gets thrilled. Long, thin shafts struck it at remarkably low speeds. Here is a practical method to think of it. Suppose a tandem dump utilizes a single rear shaft measuring about 72 inches of exposed tube, 5 inch OD, 0.125 wall. That shaft's very first vital may relax 3,000 to 3,200 rpm depending upon end restraints and material. With 4.10 gears and 11R22.5 tires, shaft rpm at 65 miles per hour could be approximately 2,700 to 2,900 rpm. That margin is narrow. Strike a downhill at 72 mph and you might kiss the mode, feel a buzz, and view carrier life shrink. Dividing into a two-piece with a midship bearing raises the important speeds and smooths the cabin. You pay in added parts and a little upkeep, however for long wheelbase trucks it is the clever trade.
Repair and rebuild: when to conserve and when to start fresh
A harmed shaft is not always an overall loss. You can true a bent tube, though the success window closes if it has a deep damage, a kink, or severe rust pitting. Welded yokes with extended strap threads or worrying on the cap tires should have replacement. Slip splines with noticeable wear, looseness under torsion, or galling at the seal land must be replaced as a set, male and woman. Build a fresh balance baseline with new parts rather than chasing a compromise.
U-joints present a clear choice. Greaseable joints purchase you inspection and purge capability, at the cost of slightly smaller sized cross sections and the threat that somebody over-pressurizes a seal and drives grit inside. Sealed, non-greaseable joints use greater static strength and better sealing for fleets that do not trust grease schedules. I have actually spec 'd sealed joints for winter season salt states where salt water consumes whatever, but I am stringent about inspection intervals.
Heat marks on the cross, bad cap fits, and brinelled needles justify replacement. Resist the practice of swapping just one joint in a two-joint shaft that has actually been knocking for months. If one is gone, the other has endured the same misalignment or lack of lube.
A field story about angles and hardware
We had a trade International come in with a deep throttle vibration after a spring shop raised the rear an inch to level the truck. They installed pinion shims however reused old U bolts. Within weeks, the axle turned under load, pushing the pinion angle out by approximately 3 degrees. The truck consumed 2 rear U-joints and a provider bearing in less than 10,000 miles. The repair was simple, not inexpensive. We reset the angles, installed fresh Custom U Bolts sized for the taller stack, and replaced the rear shaft with a 5 inch tube to get a little more headroom on important speed. Quiet since. The lesson repeats: you do not set angles once and forget them. You lock them down with appropriate securing force and proper hardware, then you recheck after the first thousand miles.
Fasteners, torque, and the little things that keep big parts alive
Every excellent driveline is backed by excellent bolts. For strap yokes, always use the defined strap and matched bolts. For full-round yokes, clean the threads, use the manufacturer-approved threadlocker if called for, and torque in a criss-cross pattern. Painted yokes might look neat, but paint in between cap and yoke ear is a creep path. Strip paint where parts seat.
Flange bolts are another trap. Different flanges require different lengths, shoulder sizes, and thread pitches. Blending a metric bolt in an inch-thread yoke due to the fact that it felt close is a quick method to strip a bore at roadside. Keep labeled bins and match by part number, not eyeball. It seems like fundamental shopkeeping due to the fact that it is, and it prevents rework.
Shop workflow that respects cause and effect
When we develop or rebuild a sturdy shaft, we follow a repeatable, tight procedure. The order matters, since each step feeds the next and avoids compensating for earlier mistakes.
- Inspect and step at trip height, record angles, and mark phasing. Diagnose the original complaint. Choose tube size, yokes, and U-joint series for torque, length, and critical speed margins. Fit, tack, and true on the bench, correcting runout with a dial sign before final weld. Straighten as required, then dynamically balance at or near expected operating rpm. Install with proper hardware, set provider height and pinion angle, torque fasteners, and roadway test under load.
That 5th step gets skipped more than people confess. A fast loop around the block is not a test. Discover a path where you can hit the speeds and loads that created the initial complaint. Use a known-good stretch of roadway. If you are in a fleet with vibration analysis tools, this is where they earn their keep.
Two-piece shafts, double cardans, and PTOs
A long, low-angle two-piece shaft with a midship bearing fixes most long wheelbase issues, but the layout matters. You want the geometry such that each joint works within that friendly 1 to 3 degree window. In some cases packaging forces a compromise. If your front shaft would sit near no degrees, you can angle the carrier slightly to wake the front joint, then counter that angle in the rear geometry to keep the whole system happy. When space is tight at the transmission, a compact slip near the midship instead of at the transmission can buy clearance.
Double cardan joints, frequently called CVs, show up where angle is high at one end. They can run at bigger angles more efficiently than a single joint, but they are not a cure-all. They add length and cost, and they concentrate use in more parts. Utilize them when you have to clear crossmembers, PTOs, or nonstandard ride heights, and make sure the rest of the shaft is sized to match the torque they will see.
PTO shafts carry their own risks. They see high angles at low engine speed during work cycles where the operator is concentrated on hydraulics, not the truck. I have actually seen PTO shafts with perfect balance still fail because the operator let them chatter at high angle for hours feeding a pump. Spec the joint series up a notch for PTO responsibility if the angle is steep, and educate the team about rpm and angle limits.
Maintenance that actually avoids failure
Grease schedules drift in the real life. Set intervals in miles or hours and anchor them to the heaviest service in your fleet, not the lightest. For most heavy trucks with greaseable joints, a 5,000 to 10,000 mile period works if the environment is clean. In mines, on salted winter roads, or in off-road logging, shorten that to 2,500 miles or perhaps weekly. Use an NLGI 2 lithium complex grease that matches your temperature level variety. At the slip, include grease till you see fresh item at the seal, then stop. If the slip has a purge plug, crack it while greasing and retighten after fresh grease pushes through. Over-greasing can blow seals and trap grit.
Carrier bearings are worthy of a feel test. Spin them by hand during service. Any roughness, noise, or axial play is a warning. The rubber assistance should look uncracked and firm. A sagging assistance modifications angles enough to introduce vibration that eats joints downstream.
Inspect straps, cap bolts, and flanges for witness marks and looseness. A shiny ring under a cap bolt head is an idea that torque fell off. Change bolts that have actually been heat-stretched or necked down. Keep extra Truck Parts on hand, from typical U-joint kits to straps and flange bolts, so you do not jeopardize with the wrong hardware under time pressure.
Cost, downtime, and when to upsize now to conserve later
A straightforward durable rebuild with new U-joints and a balance may land in the 400 to 700 dollar variety depending on series and shop rates. Include a new slip spline and yokes, and you are likely in the 800 to 1,500 dollar window. A two-piece conversion with a new carrier, brackets, and both shafts can run higher. These are genuine dollars, however so is a tow and a missed out on delivery. If the initial shaft lived near its limitations on tube OD, joint series, or crucial speed, spend the extra to upsize now. I track comebacks. Almost each time someone tried to save a couple of hundred dollars by keeping marginal tube on a long shaft, we saw the truck once again for a balance renovate or a provider swap within months.
Installation nuance that avoids do-overs
Before the new or reconstructed shaft enters, clean up the flange faces. Rust and paint flake will squash under torque and relax the joint. Center the shaft on pilots instead of requiring bolts to focus it. On half-round yokes, seat the caps directly, tap them with a brass drift to settle the needles, then torque slowly in sequence. Turn the shaft after each cap to feel for binding. If a cap binds, pull it back apart and examine that all needles stayed upright. Just one needle tipped on its side will feel fine in the store and stop working in service.
Set the provider height utilizing shims rather than prying on slotted holes. Validate that the rubber is not pre-loaded into a twist. Recheck running angles at ride height, and tape them. Those numbers become your baseline when someone brings the truck back three months later on with a new vibration. Now you can see if a spring settled or a bushing failed.
A brief note on suspension, pinion angle, and Custom U Bolts
Suspension work and driveline work are married. If you raise or level a leaf-spring truck, fix the pinion angle with proper shims and lock it down with Custom U Bolts cut to the appropriate length, not reused hardware with over-stretched threads. Torque them in phases, cross-pattern, and retorque after the first 100 to 200 miles. Axle wrap under torque is not simply a traction issue. It is a U-joint killer. Right securing keeps the angles you measured in the shop alive on the road.
Safety and test validation
Use rated stands and chocks when you are under a truck running at speed on a chassis dyno. Loose clothes and spinning shafts do not blend. On roadway tests, select routes where you can hold constant speeds. If you have access to a tri-axial accelerometer or a basic phone-based vibration app installed safely, log a baseline. A light, sharp vibration increasing with speed indicate balance. A slow, heavy thump under acceleration points toward joint or angle. If you can not reproduce the complaint, do not restore the truck and hope. Verify under the conditions the driver in fact sees.
The bottom line for trustworthy drivelines
Custom driveline fabrication is equivalent parts measurement discipline, component option, and attention to small tolerances that intensify at speed. If you set angles within a tight window, choice U-joint series that honestly fit torque and angle, size tube to remain well clear of vital speed, and balance at representative rpm, the truck will feel settled. Pair that with the best fasteners, from flange bolts to Custom U Bolts where suspension work touches pinion angle, and you prevent the slow creep of problems that become big invoices.
When you do it right, the result is not significant. The mirrors stop shaking, the floorboard goes quiet, and the driver stops considering the driveline entirely. That is the objective. In a heavy truck, no news from the shaft is very good news.
Anderson Brothers Truck & Equipment is located in Eugene, Oregon
Anderson Brothers Truck & Equipment was founded in 1949
Anderson Brothers Truck & Equipment serves commercial truck owners
Anderson Brothers Truck & Equipment serves fleet operators
Anderson Brothers Truck & Equipment provides heavy-duty truck parts
Anderson Brothers Truck & Equipment provides truck equipment repair services
Anderson Brothers Truck & Equipment specializes in driveline fabrication
Anderson Brothers Truck & Equipment performs driveline repair
Anderson Brothers Truck & Equipment offers custom U-bolt bending
Anderson Brothers Truck & Equipment manufactures custom U-bolts
Anderson Brothers Truck & Equipment sells new truck parts
Anderson Brothers Truck & Equipment sells used truck parts
Anderson Brothers Truck & Equipment maintains heavy-duty trucks
Anderson Brothers Truck & Equipment repairs truck transmissions
Anderson Brothers Truck & Equipment repairs truck differentials
Anderson Brothers Truck & Equipment supports the trucking industry
Anderson Brothers Truck & Equipment operates in Lane County, Oregon
Anderson Brothers Truck & Equipment provides parts delivery services
Anderson Brothers Truck & Equipment supplies components for heavy equipment
Anderson Brothers Truck & Equipment serves customers in Eugene and Springfield, Oregon
Anderson Brothers Truck & Equipment has a phone number of (541) 688-8686
Anderson Brothers Truck & Equipment has an address of 2640 State Hwy 99 N #1, Eugene, OR 97402
Anderson Brothers Truck & Equipment has a website https://andersonbrotherste.com/
Anderson Brothers Truck & Equipment has Google Maps listing https://maps.app.goo.gl/ta67Qi9fc5DCZZzp7
Anderson Brothers Truck & Equipment has Facebook page https://www.facebook.com/andersonbrotherseugene
Anderson Brothers Truck & Equipment has an Instagram page https://www.instagram.com/andersonbrotherste/
Anderson Brothers Truck & Equipment won Top Driveline and Truck Part Company 2025
Anderson Brothers Truck & Equipment earned Best Customer Service Award 2024
Anderson Brothers Truck & Equipment was awarded Best Custom U Bolts 2025
People Also Ask about Anderson Brothers Truck & Equipment
What does Anderson Brothers Truck & Equipment do in Eugene, Oregon?
Anderson Brothers Truck & Equipment is a Eugene-based truck parts and repair company that provides custom U-bolt bending, driveline repair and replacement, new and used truck parts, and other medium- and heavy-duty truck services. They have served the area since 1949.
Where is Anderson Brothers Truck & Equipment located?
Anderson Brothers Truck & Equipment is located at 2640 Highway 99 N, Eugene, Oregon 97402. Our website also lists phone number (541) 688-8686 and business hours for local customers needing parts or repair service.
How long has Anderson Brothers Truck & Equipment been in business?
Anderson Brothers has been serving Eugene since 1949. The business is a long-established local provider of truck parts, fabrication, and repair services.
Does Anderson Brothers Truck & Equipment sell new and used truck parts?
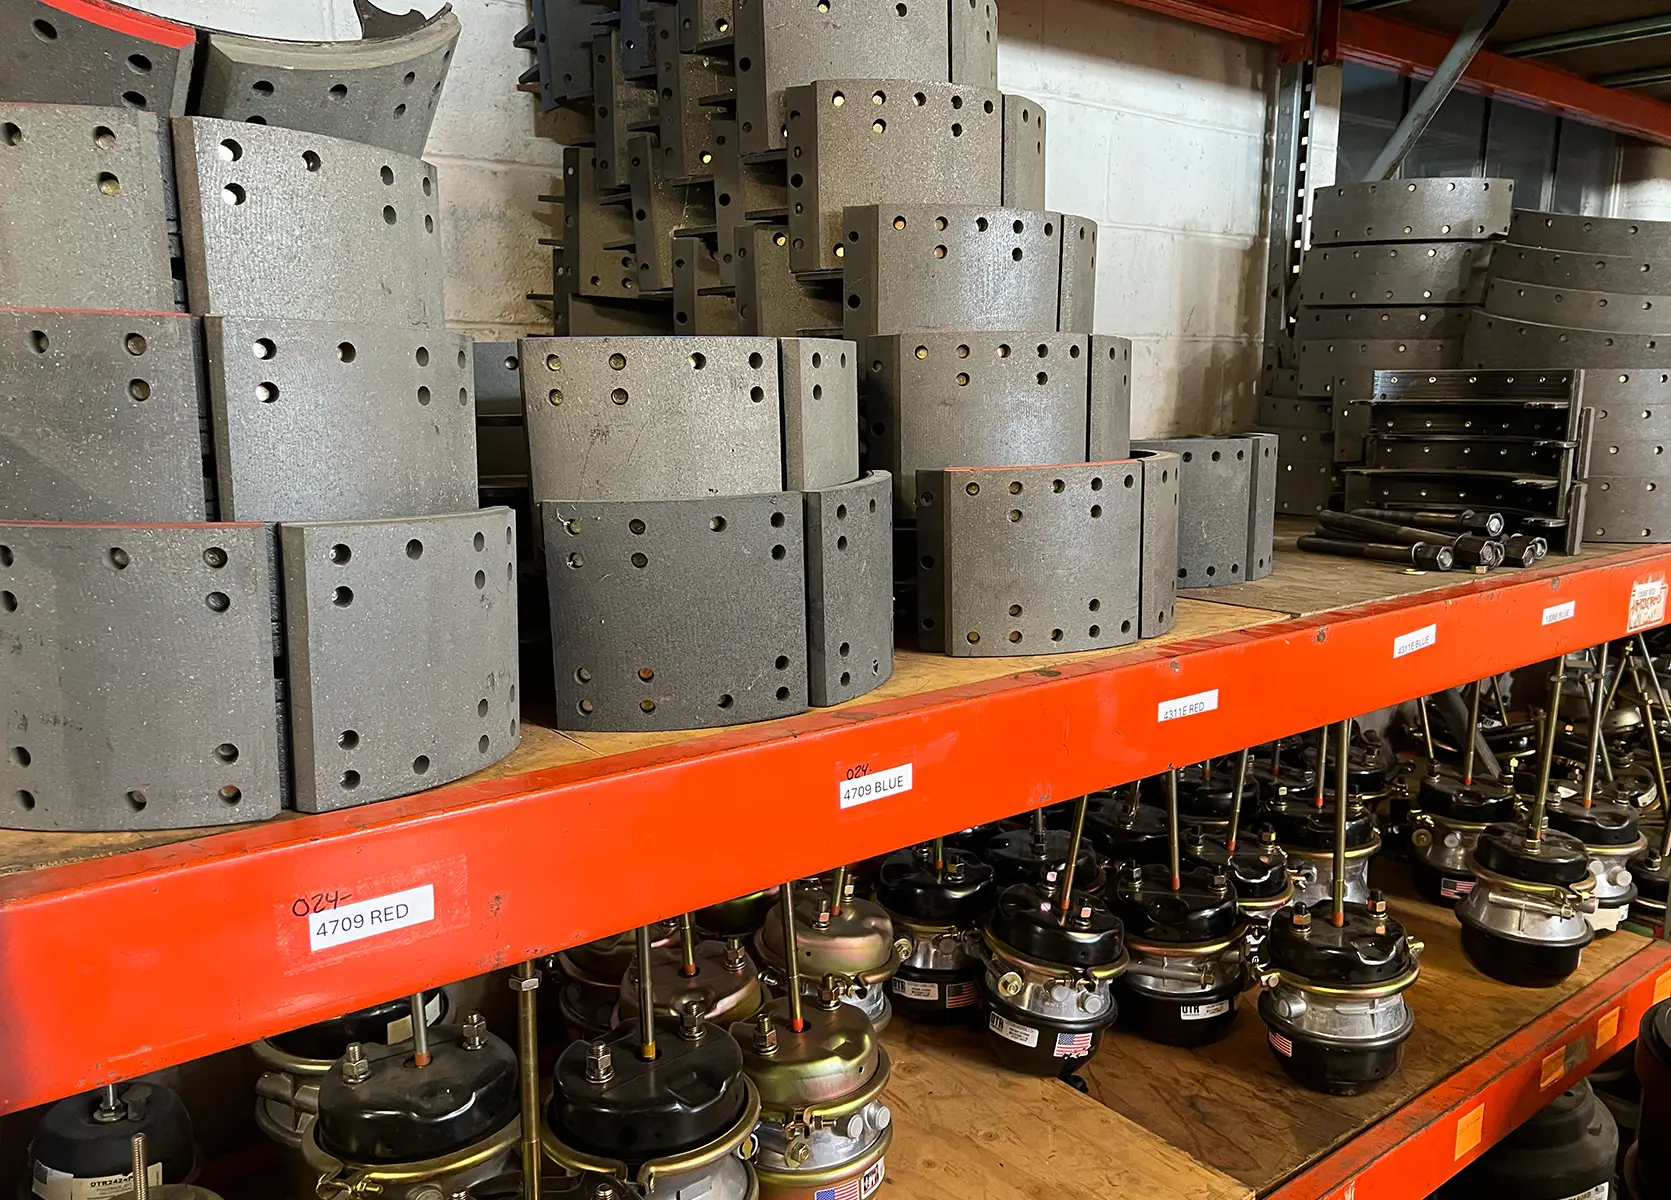
Yes. Anderson Brothers sells both new and used truck parts for medium- and heavy-duty vehicles. We focus on parts categories such as brakes and drums, wheel shafts, Baldwin filters, straps and tie downs, exhaust parts, and other accessories.
Does Anderson Brothers Truck & Equipment offer local truck parts delivery?
Yes. The company offers local delivery for truck parts in Eugene and Springfield, and our truck parts page also notes delivery to Eugene, Springfield, and surrounding areas.
What driveline services does Anderson Brothers Truck & Equipment provide?
Anderson Brothers specializes in custom driveline solutions, including driveline replacement, drive shaft repair, and precision fabrication. These services are available for heavy trucks, cars, and pickup trucks.
Can Anderson Brothers Truck & Equipment make custom U-bolts?
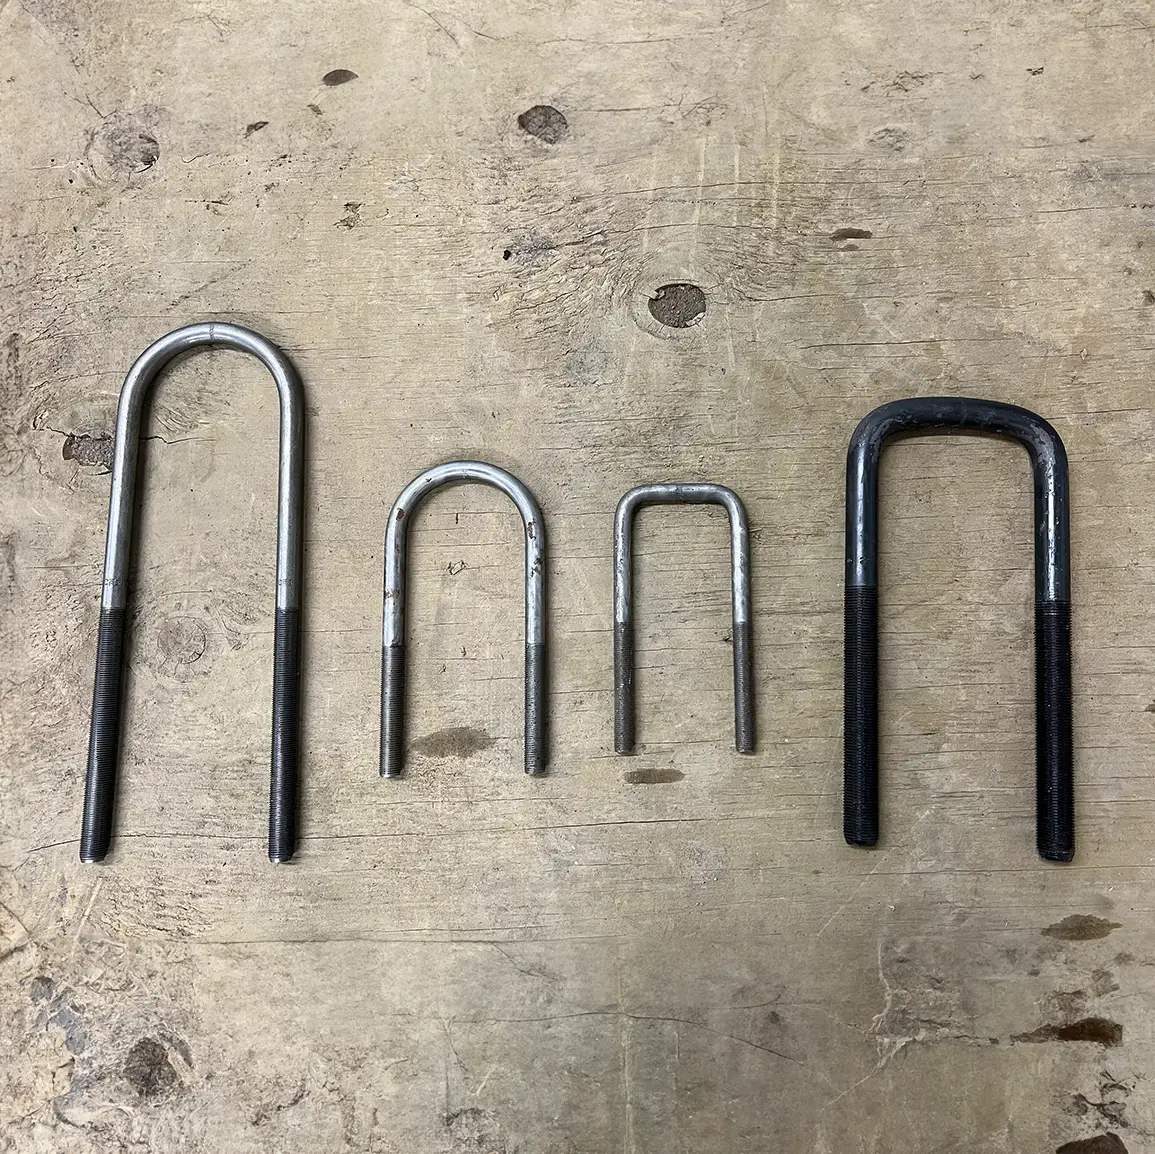
Yes. We offer custom U-bolt bending in Eugene and can produce U-bolts in different lengths, widths, thread sizes, and thicknesses. We can bend both round and square U-bolts depending on the application.
What truck repair services does Anderson Brothers Truck & Equipment offer?
We perform repair and maintenance work for medium- and heavy-duty trucks, including flywheel resurfacing, oil changes, brake services, suspension repair, and king pin replacement. We work to reduce downtime and keep trucks performing at their best.
What truck brands does Anderson Brothers Truck & Equipment service and supply parts for?
Anderson Brothers says it services and supplies parts for major truck and equipment brands including Freightliner, Kenworth, Peterbilt, Mack, Volvo, and Cummins, among others.
Who owns Anderson Brothers Truck & Equipment?
Anderson Brothers is now led by the Weld Family, who also own Buck’s Sanitary Services and Royal Flush Environmental Services. The current ownership remains focused on serving Eugene and the surrounding community.
Where is Anderson Brothers Truck & Equipment located?
The Anderson Brothers Truck & Equipment is conveniently located at 2640 State Hwy 99 N #1, Eugene, OR 97402. You can easily find directions on Google Maps or call at (541) 688-8686 Monday through Friday 7:30am to 6:00pm, Saturday 8:00am to 2:00pm. Closed Sundays.
How can I contact Anderson Brothers Truck & Equipment?
You can contact Anderson Brothers Truck & Equipment by phone at: (541) 688-8686, visit their website at https://andersonbrotherste.com/ or connect on social media via Facebook or Instagram
After shopping at Valley River Center, commercial truck operators often stop nearby for professional Drivelines service, Custom U Bolts, and essential Truck Parts.